FREE K-12 standards-aligned STEM
curriculum for educators everywhere!
Find more at TeachEngineering.org .
- TeachEngineering
- Hydrogen-Oxygen Reaction Lab

Hands-on Activity Hydrogen-Oxygen Reaction Lab
Grade Level: 9 (9-12)
Time Required: 1 hours 15 minutes
Expendable Cost/Group: US $5.00
Group Size: 2
Activity Dependency: None
Subject Areas: Chemistry
NGSS Performance Expectations:

TE Newsletter
Engineering connection, learning objectives, materials list, worksheets and attachments, more curriculum like this, pre-req knowledge, introduction/motivation, vocabulary/definitions, troubleshooting tips, activity extensions, additional multimedia support, user comments & tips.

Many engineered systems have chemical components that react to create new products, release energy or change the state of materials. Engineers who design combustion engines, fuel cells, batteries, medicines, cosmetics, processed foods and many other products, calculate and control chemical reactions as part of their work. As part of their design efforts, chemical engineers, materials engineers, environmental engineers, food engineers, and others, perform chemical reaction calculations and test their correctness in the lab.
Oxygen and hydrogen combine to produce water as well as release energy. Engineers apply this energy-releasing reaction concept to solve real-life problems, such as hydrogen-fueled rockets and fuel cells that generate electrical power for vehicles and homes. Unlike traditional hydrocarbon fuels, hydrogen and oxygen do not produce any polluting byproducts, making it an alternative renewable source of energy. Many engineers are developing technologies to efficiently exploit the potential of hydrogen energy.
After this activity, students should be able to:
- Balance chemical equations.
- Safely follow instructions and correctly use laboratory equipment.
- Use qualitative data to explain the validity of a given hypothesis.
- Explain relationships between the tested variables and observed results.
- Explain the importance of following strict laboratory procedures to obtain desired results and keep everyone safe.
Educational Standards Each TeachEngineering lesson or activity is correlated to one or more K-12 science, technology, engineering or math (STEM) educational standards. All 100,000+ K-12 STEM standards covered in TeachEngineering are collected, maintained and packaged by the Achievement Standards Network (ASN) , a project of D2L (www.achievementstandards.org). In the ASN, standards are hierarchically structured: first by source; e.g. , by state; within source by type; e.g. , science or mathematics; within type by subtype, then by grade, etc .
Ngss: next generation science standards - science, common core state standards - math.
View aligned curriculum
Do you agree with this alignment? Thanks for your feedback!
International Technology and Engineering Educators Association - Technology
State standards, washington - math, washington - science.
Each group needs:
- hydrogen generator, refer to the Hydrogen Generator - Teacher Preparation Instructions for required materials (gas generator kit, chemicals, lab equipment, etc.)
- oxygen generator, refer to the Oxygen Generator - Teacher Preparation Instructions for required materials (gas generator kit, chemicals, lab equipment, etc.)
NOTE: alternatively, prepare a hydrogen bag generator and an oxygen bag generator for the entire class to use; refer to the Gas Bags - Teacher Preparation Instructions for required materials
- 2 pipette bulbs (a plastic pipette with an approximately 15 ml bulb; the plastic stem must be cut and the hole in the bulb must be large enough to fit over the gas outlet tube in the generators)
- 2 x 250 ml beakers filled with water, to hold generators and maintain constant temperature
- book of matches
- short candle
- safety glasses/goggles, pair per person
- chemical-resistant gloves, pair per person
- Microscale Experiment with Hydrogen & Oxygen Combustion Worksheet , one per person
Students should be familiar with:
- Balancing chemical equations.
- Measuring and weighing solids and liquids.
- Qualitative and quantitative data.
Combine two parts hydrogen with one part oxygen and what do you get? (See if students know.) You get water and an energy release (in the form of a loud POW!). Engineers apply this energy-releasing concept to solve real-life problems. Unlike traditional hydrocarbon fuels, hydrogen and oxygen do not produce any polluting byproducts, making it a great alternative renewable source of energy for vehicles and other systems that require energy (fuel or electrical) to operate. The energy-releasing reaction is similar to that used in hydrogen-fueled rockets and fuel cells.
Hydrogen is one of two natural elements that combine to make water. Hydrogen is not an energy source, but an energy carrier because it takes a great deal of energy to extract it from water. Many engineers are developing technologies that can efficiently exploit the potential of this energy-releasing reaction. Hydrogen energy is useful as a compact energy source in fuel cells and batteries.
Have you heard about fuel cells in the news? According to many reports, we may soon be using this new energy-saving technology to generate electrical power for our homes and cars. The technology is extremely interesting to people in all walks of life because it offers a means of making power more efficiently and with less pollution. Let's learn more about how it works. (Proceed to deliver suitable content information to students from the background information provided below.)
Hydrogen-Fueled Rockets
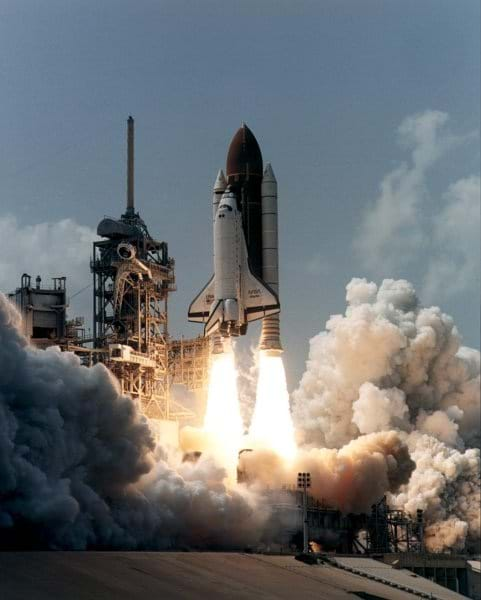
When hydrogen is mixed with oxygen (typically in the form of air), it can burn with a spark ignition. Since hydrogen is a huge storage of energy when it burns (and the chemical bonds are broken) it produces exothermic energy in the form of heat and thrust energy. This thrust energy can be transferred to a rocket to propel it upwards.
Rockets are usually powered by a chemical reaction or explosion within the rocket itself. The first types of rockets were fireworks. Rockets can be powered by different types of fuel. Early Chinese rockets used gunpowder, and later on people used gasoline and other petroleum products to fuel rockets. Rocket fuels often were kept frozen to avoid explosions. Some rockets combine hydrogen and oxygen to create an intense chemical reaction. Some, such as the Russian N1, use kerosene. The Saturn V had three stages and used petroleum fuel in stage 1 and hydrogen fuel in states 2 and 3.
The most powerful rocket ever built was the Saturn V, which was used to deliver a human to the moon. But the most powerful rocket engine ever built is the space shuttle's rocket booster. (The Saturn V was more powerful because it used five engines instead of the two used by the shuttle.) The shuttle boosters are fueled by a solid fuel mixture that is mainly aluminum and ammonium perchlorate.
When most people think about motors or engines, they think of gasoline engines in cars, which produces rotational energy to drive the wheels. Electric motors produce rotational energy to drive fans or spin disks. A steam engine, steam turbine and most gas turbines are used to do the same things.
Rocket engines are fundamentally different. Rocket engines are reaction engines. The basic principle driving a rocket engine is the physical law that "to every action there is an equal and opposite reaction." A rocket engine "throws mass" in one direction and benefits from the reaction that occurs in the other direction. What are some everyday examples of "throwing mass"?
- If you have ever seen a big shotgun fired in the movies or on TV, then you might have noticed the "kick" or "recoil" from the gun being fired. When a person shoots the gun, an exploding force "kicks" the shooter's shoulder back with a great deal of energy. That kick is a reaction. A shotgun shoots about an ounce of metal in one direction at about 700 miles per hour, and the firing person's shoulder gets hit with the reaction. If the person firing the gun was wearing roller skates or standing on a skateboard when the gun was fired, then the gun would seem like a rocket engine because the person would roll in the opposite direction (the reaction).
- Have you ever blown up a balloon and then just let it go? The balloon flies all around the room before running out of air. By doing this, you have created a rocket engine. In this case, what is being thrown is the air molecules inside the balloon. Many people mistakenly believe that air molecules do not weigh anything, but they do. When you "throw them" out the balloon opening, the rest of the balloon reacts by moving in the opposite direction.
- When a big fire hose sprays water, it takes a lot of strength to hold the hose. Sometimes you see two or three firefighters working together to keep the hose under control. The hose is acting like a rocket engine. As the hose "throws water" in one direction, the firefighters use their strength and weight to counteract the reaction. If they let go, the hose thrashes around with tremendous force. If the firefighters were all standing on skateboards, the hose would propel them backwards with great force.
Hydrogen Fuel Cells
Hydrogen is a versatile energy carrier that can be used to power nearly every energy need. A fuel cell is an electrochemical device that converts hydrogen and oxygen into water, producing electricity and heat in the process. It operates at a high level of efficiency (two to three times more efficient than traditional combustion systems) with little noise or air pollution. In principle, a fuel cell operates like a battery. Unlike a battery, a fuel cell does not run down or require recharging. It produces energy in the form of electricity and heat as long as fuel is supplied. Fuel cells can power almost any application that typically uses batteries and also power our modes of transportation, such as personal vehicles, trucks, buses and water vehicles. Hydrogen fuel cells have the potential to play an important role in the future by replacing the use of imported oil and gasoline currently used.
As an example, a conventional power plant typically generates electricity at efficiencies of 33-35%, while fuel cell systems can generate electricity at efficiencies up to 60%. The gasoline engine in a typical car is less than 20% efficient in converting the chemical energy in gasoline into power that moves the vehicle. Hydrogen fuel cell vehicles, which use electric motors, are much more energy efficient and use 40-60% of the fuel's energy. This corresponds to more than a 50% reduction in fuel consumption compared to a typical vehicle with a gasoline ICE (internal combustion engine).
Fuel Cell Design
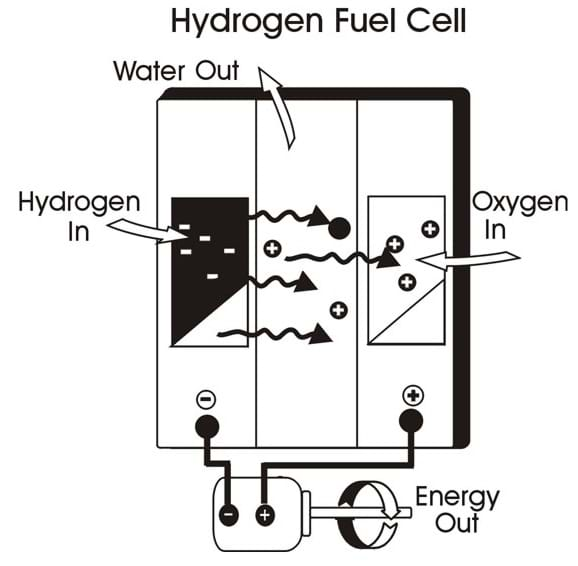
A single fuel cell consists of an electrolyte (a substance containing free ions that make it electrically conductive) sandwiched between two electrodes, an anode and a cathode. Bipolar plates on either side of the cell help distribute gases and serve as current collectors.
Polymer electrolyte membrane (PEM): In a PEM fuel cell, a type of fuel cell, hydrogen gas flows through channels to the anode, where a catalyst causes the hydrogen molecules to separate into protons and electrons. The membrane allows only the protons to pass through it. While the protons are conducted through the membrane to the other side of the cell, the stream of negatively-charged electrons follows an external circuit to the cathode. This flow of electrons is electricity that can be used power a motor. On the other side of the cell, oxygen gas (typically supplied from air that contains approximately 79% N 2 and 21% O 2 ), flows through channels to the cathode. The electrons react with oxygen and the hydrogen protons (which have moved through the membrane) at the cathode to form water. This results in an exothermic reaction that generates heat that can be used outside the fuel cell.
Everyday Fuel Cells
Fuel cells have played a role in the space program by supplying electricity to several missions. Fuel cell energy is anticipated to replace traditional power sources in the coming years—from micro fuel cells in cell phones to high-powered fuel cells for stock car racing. Engineers at the major automakers are working to commercialize fuel cell cars. Many uses for fuel cells currently exist; they are powering buses, boats, trains, planes, scooters and even bicycles. We are using fuel cell-powered vending machines, vacuum cleaners and highway road signs. Miniature fuel cells for cellular phones, laptop computers and portable electronics are on their way to market—and the possibilities are endless.
Environmental and Health Impacts
About 25% of all human-generated greenhouse gases are released from powering our many modes of transportation, with more than half of that from light-duty vehicles. Because fuel cells significantly reduce greenhouse gas and other emissions, it is an important technology in our efforts to reduce pollution, which contributes to global warming, smog and other pollution consequences. When hydrogen is carried onboard a fuel-cell powered vehicle, zero emissions result. The use of fuel cells reduces local air and noise pollution and groundwater contamination, and improves public health and safety by reducing citizens' exposure to fuel and emissions dangers. Fuel cells could dramatically reduce urban air pollution, decrease oil imports, reduce the trade deficit and produce jobs because running on hydrogen derived from a renewable source emits nothing but water vapor.
Before the Activity
- Gather materials and make copies of the Microscale Experiment with Hydrogen & Oxygen Combustion Worksheet .
- Follow the instructions to build the hydrogen and oxygen generators (or build the hydrogen and oxygen bags).
- Modify the pipette bulbs by cutting the hole in the plastic stem; the hole in the bulb must be large enough to fit over the gas outlet tube in the generator.
- As necessary, conduct the experiment to gain demonstration experience.
With the Students
- Present the Introduction/Motivation content. Briefly talk about developments in hydrogen gas production and its use as rocket fuel and for fuel cells.
- Describe how combustion works and the importance of oxygen.
- Ask students: Do you think that gasoline and methane can burn without oxygen? Looking at the general chemical reaction for combustion, you need fuel +oxidizer +spark in order for combustion to occur.
- Describe the principle behind "throwing mass" to propel an object. This is how a rocket works.
- Describe how hydrogen can be used for energy storage (the principle behind the enormous energy source potential of fuel cells).
- Show students an unbalanced chemical equation (refer to the worksheet and Figure 1). Describe how matter cannot be created or destroyed, and hint that the law of conservation of energy gives them a clue how to balance the chemical equation.
- Have students work together for a few minutes to try to balance the equations.
- Walk through the balancing procedure; if possible, have students do most of the explaining.
- Introduce the concept of qualitative data, which is data not described by specific numbers, but rather by approximate quantities or relationships.
- Divide the class into groups of two students each and have them move to designated stations with the materials needed. Direct them to put on safety equipment and follow the worksheet instructions carefully to ensure safe practices. Put on your own safety lab gear.
- As a class, walk through the worksheet procedures while performing a demonstration.
- Put fresh hydrochloric acid and hydrogen peroxide solutions in group generators.
- As you walk around filling generator stations, ask questions about the results students are getting.
- Expect students to hear explosions as part of the experiment. If no explosion, ask if it was an ineffective combination or a procedural error.
- Have students compare their results with other groups to validate their own.
- Once groups are finished, have them sit down with their results and answer the worksheet post-lab questions about their data. Make sure they make the connections between the theoretical equation and their results by pointing out how the 2:1 ratio of gas in the equation related to the 2:1 gas mixture they just created.
anode: The terminal on a device where current flows in from outside.
balanced chemical reaction: A chemical equation that balances the atoms and molecules on one side with the atoms and molecules on the other side. The reactants on the left side are equal to the products on the right side.
cathode: The terminal on a device where current flows out.
chemical reaction: A process that involves rearrangement of the molecular or ionic structure of a substance, as opposed to a change in physical form or a nuclear reaction.
combustion: A chemical change; the burning of a fuel and oxidant to produce heat and/or work.
electron: A stable subatomic particle with a charge of negative electricity, found in all atoms and acting as the primary carrier of electricity in solids.
kick or recoil: A backward motion resulting in a sudden jerk or jump.
membrane: A pliable sheet-like structure acting as a boundary, lining or partition.
PEM: Acronym for polymer electrolyte membrane. A fuel cell that incorporates a solid polymer membrane used as its electrolyte.
proton: A stable subatomic particle occurring in all atomic nuclei, with a positive electric charge equal in magnitude to that of an electron.
qualitative data: Data that approximates or characterizes, but does not measure the attributes, characteristics, properties, etc., of a thing or phenomenon. Qualitative data describes, whereas quantitative data defines.
quantitative data: Data that can be quantified and verified, and is amenable to statistical manipulation. Quantitative data defines whereas qualitative data describes.
ratio: An expression of the magnitude of one quantity relative to another quantity.
Activity Embedded Assessment
Discussions: During the activity, walk around and help students troubleshoot the lab. Ask them questions about the reaction and the results they are getting. Have students from each lab group explain to you the process and results. Make sure all students are participating as equally as possible. Additionally, discuss applications of this type of energy to helping solve real-world problems from an engineering point-of-view.
Post-Activity Assessment
Worksheets: Collect and grade the worksheets. Review their answers to gauge their comprehension.
Concluding Discussion: As a class, share and discuss results and conclusions. Ask the following questions:
- Discuss the post-lab questions as a group. Address common misunderstandings that you observe from grading the worksheets.
- Is a car that runs off of a fuel cell completely emissions free? Why or why not? (students should realize that energy must be invested to generate the hydrogen fuel).
- Now that you have seen the mathematics involved in an explosion, how would you describe it to someone who did not understand how explosions work?
Safety Issues
- Require students to wear safety glasses (or goggles) and chemical resistant gloves during this experiment. Have everyone involved, including the instructor and observers, wear safety glasses.
- Take care when handling open flames.
The specified dilutions of hydrochloric acid and hydrogen peroxide solutions used in the gas generators lose their effectiveness in about five minutes, so prepare and give groups fresh solutions right before they are needed. More concentrated solutions may be too dangerous to use at the high school level.
In this activity, students balanced chemical equations based on conservation of energy. Now, have students discuss why the formation of H 2 O makes sense from knowing the outermost electron states of hydrogen and oxygen.
- How many electrons does oxygen need to complete its octet? What can hydrogen do to have a full outer shell of electrons?
- Have students draw an electron diagram for water.
- What are these shared bonds called? (Covalent bonds).
- Given the locations of oxygen and hydrogen on the periodic table, how reactive would we expect these elements to be? Does this make sense given your combustion observations?
See a good fuel cell diagram at http://www.blogcdn.com/www.bloggingstocks.com/media/2007/02/fuel-cell01.gif

The purpose of this lesson is to teach students how a spacecraft gets from the surface of the Earth to Mars. Students first investigate rockets and how they are able to get us into space. Finally, the nature of an orbit is discussed as well as how orbits enable us to get from planet to planet — spec...

Students acquire a basic understanding of the science and engineering of space travel as well as a brief history of space exploration. They learn about the scientists and engineers who made space travel possible and briefly examine some famous space missions.

Students learn how rocket thrust is generated with propellant. The two types of propellants are discussed—liquid and solid—and their relation to their use on rockets is investigated. Students learn why engineers need to know the different properties of propellants.

Students explore motion, rockets and rocket motion while assisting Spacewoman Tess, Spaceman Rohan and Maya in their explorations. First they learn some basic facts about vehicles, rockets and why we use them. Then, they discover that the motion of all objects—including the flight of a rocket and mo...

Contributors
Supporting program, acknowledgements.
This content was developed by the Culturally Relevant Engineering Application in Mathematics (CREAM) Program in the Engineering Education Research Center, College of Engineering and Architecture at Washington State University under National Science Foundation GK-12 grant no. DGE 0538652. However, these contents do not necessarily represent the policies of the NSF, and you should not assume endorsement by the federal government.
Last modified: October 3, 2020

Science in School
Playing with fire: stoichiometric reactions and gas combustion teach article.
Author(s): Isabelle Paternotte and Philippe Wilock
Great balls of fire: Try these dramatic experiments with gases to illustrate stoichiometric reactions and combustion.
Reactions with dramatic visual or auditory effects provide engaging examples to illustrate stoichiometric reactions.
The following activities are suitable for students encountered aged 14–16. After calculating the quantities of solids and solutions required, gas production can be observed in a syringe. Mixtures of dihydrogen and dioxygen can then be set on fire for fun and to observe their combustion reactions. Activities 1 and 2 can be carried out by the students. The other activities are done by the teacher as a demonstration first and then the students can try them for themselves under supervision if desired.
The activity takes around 50 minutes if the theory has been discussed previously; otherwise, the activity will take 1 hour and 40 minutes.
- Understand some basic principles of chemical reactions: stoichiometry, reagent excess, states of matter.
- Visualize gas production.
- Bring excitement to the laboratory with a bang and a whoosh.
- Visualize the chemical energy produced by explosive combustion and the kinetic energy produced by gas expansion.
- Perceive the kinetic energy produced during an explosion by listening to the noise.
Gas evolution and testing setup
The basic experimental setup for gas evolution is the same for all the activities. The introduction of the reagents and the reaction itself take between 5 minutes (H 2 ) and 15 minutes (O 2 ).
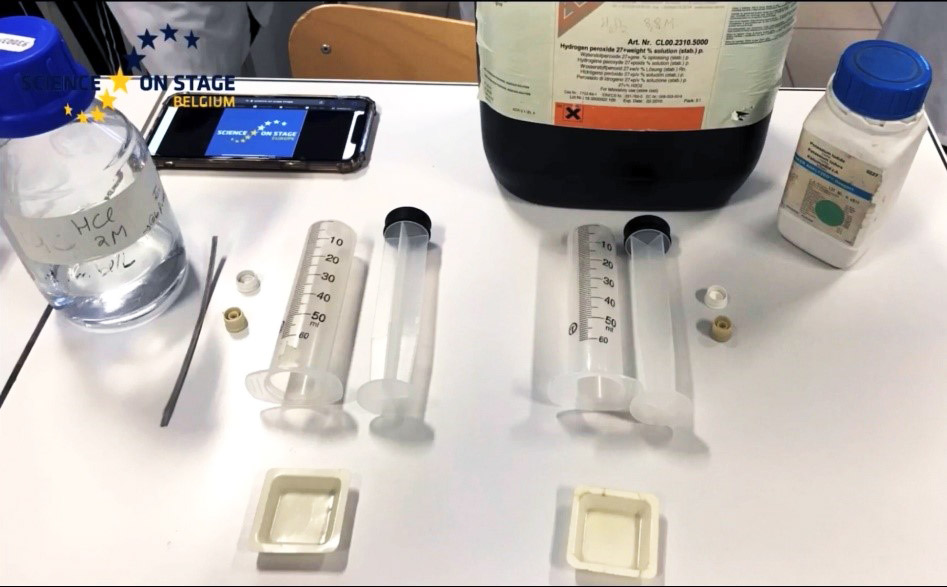
Materials for gas evolution
Used for H 2 and then O 2 in these activities but can also be used for NO 2 , NH 3 , etc. [ 1 ]
- Solid reagent + liquid reagent
- Luer-lock syringe with cap
- A small hollow vessel with a flat bottom that fits inside the syringe, for example a cap from a medicine tube
- A small container that can hold at least 5 ml of liquid reagent or soap solution (bubbles), such as a plastic weighing boat
- Dishwashing liquid and matches
- 2 cm long tube that fits on the ends of the syringes for gas transfer
General procedure for gas evolution
- Fill the small vessel with the solid reagent.
- To introduce the solid reagent into the bottom of the syringe without spilling it, fill the syringe to the brim with water and block the opening at the bottom. Place the reagent ‘boat’ on the surface of the water and lower it by allowing the water to drain away.
- Insert the plunger of the syringe as far as the small vessel without spilling the contents or jamming the syringe.

- Introduce 5 ml of the liquid reagent by drawing it up from a small container into the syringe.
- Put the cap on the syringe.
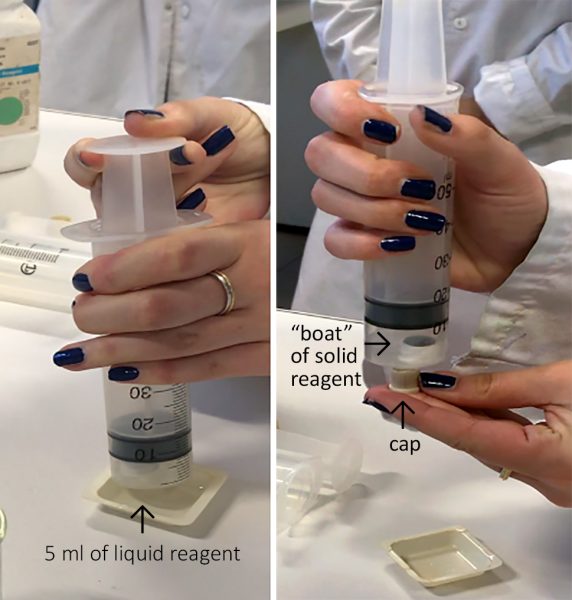
- Caution: If solid reagent spills into the syringe before the liquid is introduced, bubbles will immediately form, and the liquid will come into contact with fingers when the cap is put on.
- Shake the syringe to bring the solid and liquid into contact.
- Observe the effervescence: gas is created and the plunger rises.
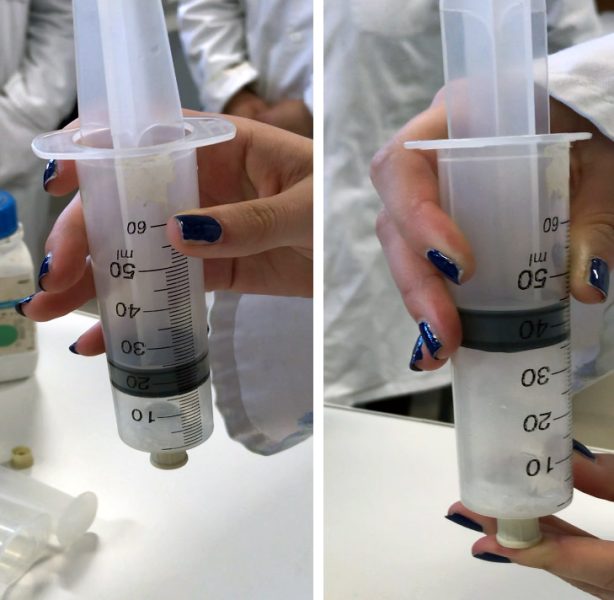
- At the end of the reaction (or if the maximum of the syringe is near), open the stopper with the syringe facing upwards, then quickly turn the syringe over and drain the liquid into a waste container.
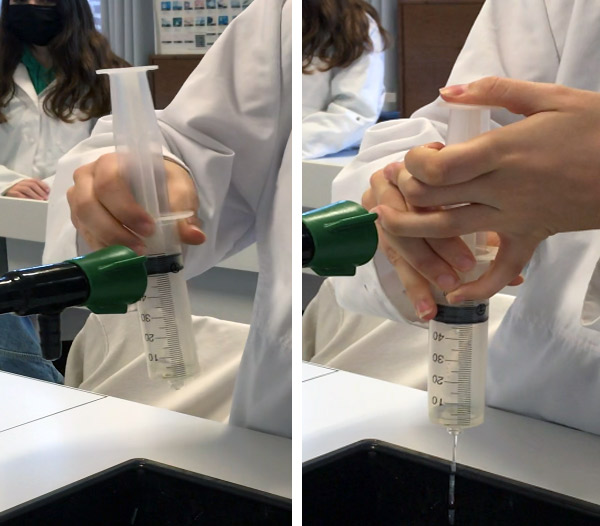
- Rinse off the gas by sucking up a little water, plugging the syringe and shaking it, and then draining off the liquid.
General procedure for gas ignition
- Prepare a soap solution from water and dishwashing soap.
- Check the foaming power of the solution with a syringe containing normal air and add more soap if it is inadequate.
- Light the match just before making the bubbles and quickly bring the flame close to the bubbles.
Safety notes
- Wear lab coats, safety glasses, and hair tied up.
- Supervise the handling of the matches: nothing flammable nearby.
- Since this is microchemistry, the amount of flammable gas produced is safe and it is trapped in the syringe.
- Due to the surprising behaviour of the bubbles when ignited, the teacher should show the first ignition, and then the students can repeat the experiments.
- The syringes should be kept pointing away from the students (especially faces) at all times.

Activity 1: Production of hydrogen
In this activity, we produce hydrogen gas using the setup described above. It should take around 3 minutes, assuming that the equipment is already set up.
- Materials listed for the basic setup
- 2 mol l −1 HCl liquid reagent
- Have the students calculate the mass of magnesium required for 5 ml of 2 mol l −1 HCl to obtain 50 ml of H 2 gas based on the following equation:
Answer: 0.05 g, which is about 1.5 cm of Mg ribbon.
- Perform the gas evolution experiment as described for the main setup, using magnesium and 2 mol l −1 HCl as the solid and liquid reagents, respectively. The magnesium ribbon can be rolled to fit in the syringe float.
- Keep the collected gas for the next activities.
Observations
Mg disappears gradually with the production of bubbles, the plunger rises within 1 min, and the syringe heats up.
Be careful with the H 2 syringe: always keep it vertical when it is opened to make the bubbles or for gas transfers. If the syringe is tilted, H 2 , which is much lighter than air, leaves the syringe and rises to the ceiling.
Activity 2: Production of oxygen
In this activity, we produce oxygen gas using the setup described above. It should take just a few minutes, assuming that the equipment is already set up.
- 0.1 g KI solid reagent
- 0.8 mol l −1 H 2 O 2 liquid reagent
- Have the students calculate the concentration of hydrogen peroxide required for 5 ml of the H 2 O 2 solution to obtain 50 ml of O 2 gas according to the following equation:
Answer: 0.8 mol l −1 .
- Perform the gas evolution experiment as described for the main setup, using KI and 0.8 mol l −1 H 2 O 2 as the solid and liquid reagents, respectively.
White KI solid forms a yellow solution with hydrogen peroxide. Bubbles form mainly around the rubber of the plunger. When the plunger is pulled back, more bubbles are formed. The reaction is slow and may take up to 5 minutes.
Activity 3: Lighting pure hydrogen
In this activity, we investigate what happens when we light bubbles of hydrogen gas. It should take just a few mins after producing the gas in Activity 1. The teacher should demonstrate the ignition and then the students can try it themselves with supervision afterwards.
- Syringe of hydrogen gas produced in Activity 1
- Small tub or container
- Dishwashing soap
- Long-necked gas lighter (much safer!) or a match
- Prepare a soap solution in a small shallow container, as described in the general procedure. Check foaming power with air and add more soap if necessary.
- Make sure the syringe of hydrogen and a lit lighter/match are to hand.
- Light the flame, then quickly make bubbles of hydrogen by squeezing the syringe below the surface of the soap solution. As soon as the bubbles are formed, bring the flame (from the long-necked gas lighter or match) close to them.
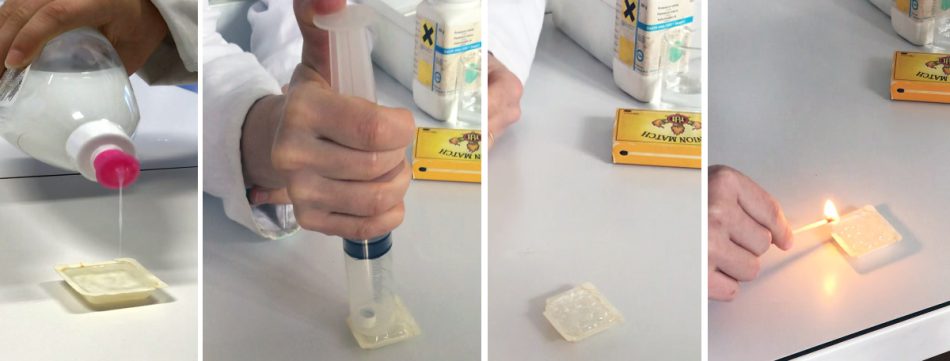
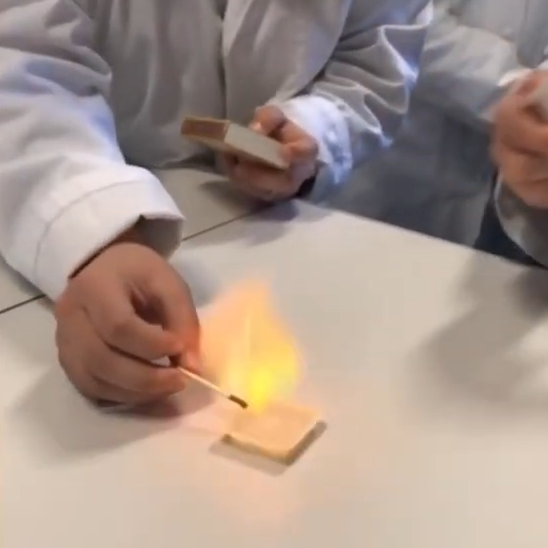
Hydrogen bubbles burn quietly, forming a fireball with a volume ten times that of the bubbles. To burn, hydrogen will take oxygen from the surrounding air.
Activity 4: Lighting pure oxygen
In this activity, we investigate what happens when we try to light bubbles of oxygen gas. It should take just a few mins after producing the gas in Activity 2. The teacher should demonstrate the activity and then the students can try it themselves with supervision afterwards.
- Syringe of oxygen gas produced in Activity 2
- Container of soap solution from Activity 3
- Long-necked gas lighter (safer) or a match
- Check the foaming power of the soap solution with air and add more soap if necessary.
- Make sure the syringe of oxygen and the lighter/match are to hand.
- Light the flame and then quickly make bubbles of oxygen by squeezing the syringe below the surface of the soap solution. As soon as the bubbles are formed, bring the flame close to them.
The oxygen bubbles do not burn (oxygen is already fully oxidized), but the flame becomes brighter with each popped bubble.
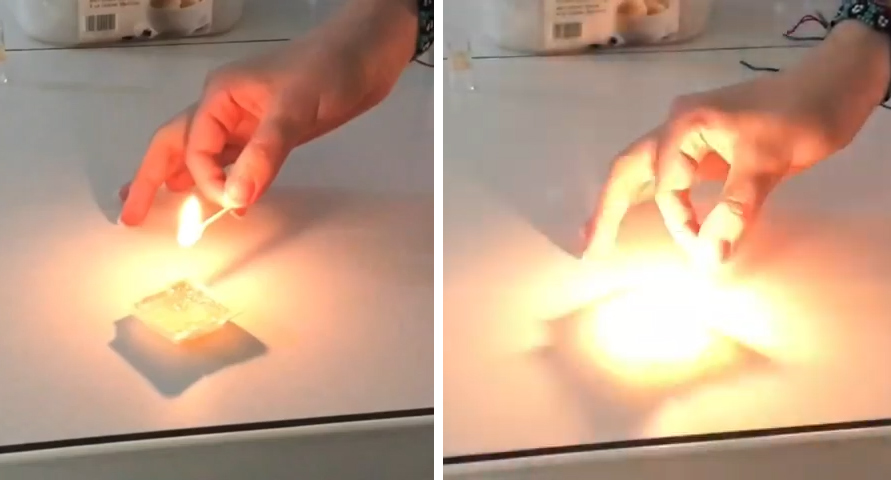
Activity 5: Lighting a mixture of hydrogen and oxygen
In this activity, a mixture of hydrogen and oxygen obtained by transferring precise amounts of O 2 to the H 2 syringes is ignited. It should take just a few mins after producing the gases in Activities 1 and 2. The teacher should demonstrate the ignition and then the students can try it themselves with supervision afterwards.
- Syringes of hydrogen and oxygen gas from Activities 1 and 2
- Tub of soap solution from Activity 3
- Fit a small connecting tube to the oxygen syringe.
- Attach the tube to the hydrogen syringe. The latter must always remain vertical and at the top.
- Push the desired amount of oxygen up into the hydrogen syringe by pushing and pulling on the two syringe plungers.
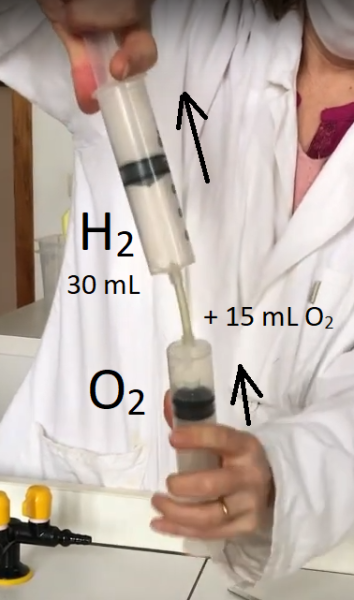
- Make sure the syringe containing the gas mixture and match are to hand.
- Warn others about a sudden noise.
- Make bubbles of the explosive mixture by squeezing the syringe below the surface of the soap solution. As soon as the bubbles are formed, bring the flame (from the long-necked gas lighter or match) close to them.
The bubbles burn instantly, making a firecracker noise. The best noise is obtained with the following stoichiometric mixture: 2 H 2 (g) + O 2 (g) → 2 H 2 O(g→l).
Activity 6: Minirocket launch
In this activity, we use the effect seen in Activity 5 to launch a minirocket. It should take around 10 minutes after producing the mixture of gases from Activity 5. This can be done as a teacher demonstration.
- Syringe containing a mixture of H 2 and O 2 from Activity 5
- 5 ml plastic pipette cut to 1 cm as the rocket
- 12 cm long tube that fits on the end of the syringe
- Tub half filled with water
- Piezoelectric gas lighter modified to produce a spark at the end of soldered electrical wires
Modification of the piezoelectric gas lighter
Remove the nose of the device (part A) by pulling it slightly apart with a screwdriver. On this part, straighten the pin (C), which serves as an electrode.
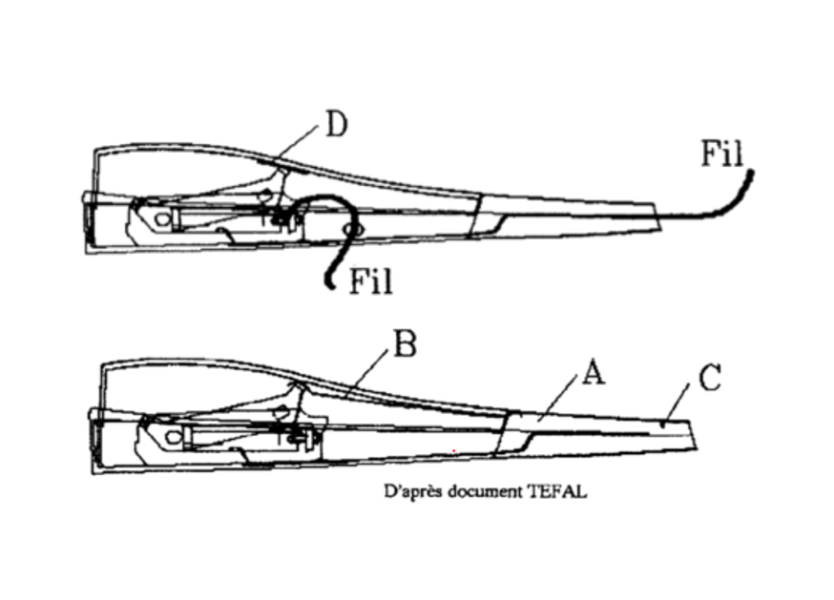
Remove the metal tab (part B), which ensures the electrical connection between the generator and the nose of the device. Solder two wires: one to the end of the central electrode and the other to the generator screw. Be careful not to deform the central electrode: it is designed to leave a space of about 1 mm between it and the generator; this space is essential to ensure a spark when the piston moves back and forth.
- Fill the minirocket with water by pressing on the body of the pipette while holding the end under water. Insert the tube into the minirocket.
- Connect the tube to the syringe containing the 2:1 mixture of H 2 and O 2 from Activity 5.
- Use the syringe to fill the minirocket, keeping it vertical so that the mixture of gases remains inside.
- Insert the wires into the bulb of the pipette (minirocket) for the spark.
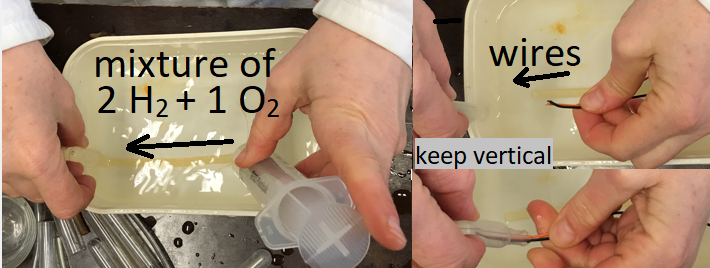
- Without the water drop, the minirocket will not take off: the gases burn, and air enters the minirocket.
- With the water drop, when the gases burn, the drop hits the top of the minirocket and causes it to lift off.
- Do not hold the minirocket. Let it go just before creating the spark with the piezoelectric gas lighter.

The minirocket takes off towards the ceiling!
[1] Mattson B, Mattson S, Anderson MP (2006) Microscale Gas Chemistry 4 th edition. Educational Innovations, Norwalk. ISBN: 0-9701077-0-6
- Watch a video of the activities in this article.
- Build a rocket in your classroom: Rønningen J-E et al. (2012) Sky-high science: building rockets at school . Science in School 22 : 34–37.
- Learn some of the key principles of rocket science with fun hands-on activities: Ahlgren O (2019) Rocket science made easy . Science in School 47 : 36–41.
- Try classroom activities on how using and controlling fire: Krzeczkowska M, Grygo-Szymanko E, Świt P (2016) Practical pyrotechnics . Science in School 38 : 46–51.
- Explore how chemical reactions can be used to heat food and teach exothermic reactions: Rau M (2011) The heat is on: heating food and drinks with chemical energy . Science in School 18 : 46–51.
- Use chemistry and physics experiments to harness alternative energy sources. Shallcross D et al. (2009) Fuelling interest: climate change experiments . Science in School 11 : 38–43.
- Explore the chemistry of climate change: Shallcross D, Harrison T (2008) Practical demonstrations to augment climate change lessons . Science in School 10 : 46–50.
- Learn how the hydrogen economy might work in practice: Mitov M, Hubenova Y (2014) A classroom hydrogen economy . Science in School 30 : 31–35.
- Explore phase transitions between different states of matter: CERN (2021) States of matter & phase transitions . Science in School 51 .
Dr Isabelle Paternotte teaches chemistry, biology, and physics at a secondary school in Belgium. She makes many videos to explain the theory of chemistry, biology, and physics through demonstrations on the YouTube channel chimie media (in French). Philippe Wilock is an AESI Belgian teacher of sciences and administrator of Science on Stage Belgium.
Supporting materials
Extension Activity (PDF)
Download this article as a PDF
Share this article
Subscribe to our newsletter.

Craig Beals travels the country with FLIR sharing the joys of science

The Beals Science Jeep Cannon shoots bowling balls more than two miles

Waiting for the ball to drop and set off hundreds of mouse traps to simulate a reaction.

Craig asks "Can Technology (re)Humanize Us?" in his TEDx talk

5 Awesome Hydrogen Explosions
Hydrogen is one of my favorite elements. It is the simplest of elements, having only one proton and one electron (in most cases) but what it lacks in mass it more than makes up for in shock and awe!
Hydrogen is highly attracted to many of the elements on the periodic table but one of its favorite elements to attach with is Oxygen . When Hydrogen gas and Oxygen gas combine, with the help of a little energy (flame or spark), the two elements rearrange themselves and combine in a synthesis combustion reaction - making Water (H2O). In each of the hydrogen explosion demonstrations in the video, the reaction is creating water and releasing heat and light as the water forms.
Hydrogen Combustion Reaction
The hydrogen combustion reaction (often referred to as "burning"), occurs when 2 molecules of Hydrogen gas (H2) reacts with 1 molecule of Oxygen gas (O2) to form 2 molecules of Water (H2O). This is the reaction that takes place inside a fuel cell :
2H2(g) + O2(g) → 2H2O(l)
Craig Beals hosts " The Science Spot " on Montana This Morning with Ed MacIntosh and Victoria Hill on KTVQ to start the morning with a Bang!
Instructions for each of the five Hydrogen explosions:
#1 : Hydrogen Balloon Explosion
Fill up a balloon with hydrogen gas
Tie balloon down to keep from floating away
Tape candle to meter stick
Place candle near balloon
Eye and hearing protection are required
#2 : Pringles Can Hydrogen Rocket
Tear fresh-seal off top of Pringles can
Poke a hold near Pringles man's eye, large enough to fit Hydrogen tube
Punch a hole in the metal bottom of the can, this will become the top
Invert Pringles can so metal portion with hole is facing up
Fill entire can with hydrogen gas, be sure to completely fill with hydrogen or it will blow up immediately
Place a rubber stopper (or anything heavy enough) over the hole on top to keep gas from escaping
Remove stopper, place lighter near hole on the top, stand back, enjoy
#3 : Soda Bottle Hydrogen Rocket
Melt or poke a hole in the bottom of a soda bottle
Melt or poke a hold about 3 cm below where the curve at the top of the bottle (neck) starts
Set up ring stand and iron ring
Invert bottle upside down so neck is facing down, resting on top of the iron ring; this is your launch pad
Fill bottle with hydrogen gas, completely evacuating all air from inside
Place rubber stopper (or anything heavy enough) over the hole on top to keep gas from escaping
Light, stand back, salute as your bottle heads to the moon
Eye and hearing protection required
#4 : Hydrogen Bubbles
Bubble solution recipe
1 cup dishwashing soap (I prefer Dawn original)
12 cups water
3/4 Tablespoon glycerin (Glycerin [also known as Glycerol] is available at most drug stores)
Turn on gas (away from all flames)
Blow bubbles using a bubble wand
Set up a flame well above hydrogen gas
Let bubbles float up into flame
Watch, smile, enjoy the burning bubbles
#5 : Hydrogen Fireball in your Hand
Make hydrogen bubbles by placing gas tube in a beaker of bubble solution (see recipe above)
Get hands wet (this provides a barrier to the flame because water has high specific heat, meaning it does NOT like to change temperature easily - this heat buffer is only temporary and does not mean you will not get burned! But, as a chemistry teacher, I have done this demo countless times and have not had any problems - however, this is not an endorsement for you to try it!)
Scoop a handful of bubbles, hold at arms length and light
Keep on Learning! ~Craig Beals

#Hydrogen #Oxygen #Combustion #Reaction #Oxidation #Water #FuelCell #Pringles #Rocket #Explosion
- Science Experiments
Recent Posts
Bowling Ball Cannon Shoots Balls Over a Mile!
Flaming Soap Bubbles - Holding a Fireball in my Hand!
Gummy Bear Sacrifice - Burning Calories with Science

IMAGES
VIDEO
COMMENTS
The reaction occurring is the combustion of hydrogen to form water: 2H 2 (g) + O 2 (g) → 2H 2 O (g), ΔH = -484 kJ mol -1. The energy released appears as heat, light, sound and kinetic energy, similar to the situation in an internal combustion engine. Mixtures of air and flammable gases usually have quite narrow explosive limits but ...
This lab exercise exposes students to a potentially new alternative energy source—hydrogen gas. Student teams are given a hydrogen generator and an oxygen generator. They balance the chemical equation for the combustion of hydrogen gas in the presence of oxygen. Then they analyze what the equation really means. Two hypotheses are given, based on what one might predict upon analyzing the ...
Repeat this part of the experiment once or twice in order for the students to clearly observe the difference in the two reactions. 4. Refill the test tubes with hydrogen gas and repeat the process, but this time hold the first test tube mouth up for a few ... Combustion of Hydrogen continued 2 21 inn ientifi n igts esered slowly and quietly. 9 ...
Great balls of fire: Try these dramatic experiments with gases to illustrate stoichiometric reactions and combustion. Reactions with dramatic visual or auditory effects provide engaging examples to illustrate stoichiometric reactions. The following activities are suitable for students encountered aged 14-16.
It was servo-assisted solenoid valve for high pressure - BURKERT 2400. Hydrogen was ejected through the orifice mounted at the exit of the valve. Orifice diameter varied from 6.0 to 5.3 mm to provide hydrogen flow rate in the range from 180 to 220 g/s. Most experiments were carried out with the orifice diameter 5.3 mm.
These experiments confirm the effectiveness of the deliberate ignition approach to controlling hydrogen. They also provide data for validating computer codes used to predict hydrogen combustion during degraded core accidents, and for assessing the performance of safety related equipment in such environments. 236 figs., 110 tabs.
In this experiment, students observe as the teacher burns a solid hydrocarbon (in the form of a tea light or candle), using a pump to divert the gaseous combustion products. ... During combustion, the carbon and hydrogen in the fuels are oxidised. The complete combustion of a hydrocarbon produces carbon dioxide and water. AQA Combined science ...
In this experiment, students observe as a 'rocket' made from a plastic fizzy drink bottle is filled with a mixture of hydrogen gas and air. The rocket is launched by igniting the mixture with an electric spark, and will fly several metres, propelled by the same reaction used to power the Space Shuttle. Use the demonstration for open days ...
Hydrogen combustion following a postulated severe accident can jeopardize the structural integrity of a Nuclear Power Plant's (NPP) containment. Computational Fluid Dynamics (CFD) modelling approach can be used to conduct a risk assessment of such an event. This paper presents the first CFD simulations based on the results from large-scale ...
When Hydrogen gas and Oxygen gas combine, with the help of a little energy (flame or spark), the two elements rearrange themselves and combine in a synthesis combustion reaction - making Water (H2O). In each of the hydrogen explosion demonstrations in the video, the reaction is creating water and releasing heat and light as the water forms.